TRAIN TRACK® Web Edition Help Manual
Security and Users
TRAIN TRACK® comes with built-in security measures. In addition, your application should be stored on a secure network, and only those with permission to use the application should have access to it through your network.
User Levels
Each user must be given a unique user name and password. Do not allow any generic or shared user names. Passwords stored in the database are encripted using the SHA-256 one-way encryption algorithm, which is one of the industry standard methods for generating digital signatures. Passwords cannot be read from the data table, and they cannot be retrieved. If a user forgets their password, it must be reset in one of two ways:
1. Passwords may be reset by the administrator (see below). The administrator may assign a temporary password which the user will be required to change after logging in.
2. Users can can click the "Forgot Password" link. If the user has an email address in the database, an email will be automatically sent with a reset password link.
Each user must also be assigned an access level. Each screen within the application is restricted based on user access level. Available user access levels are described below.
User Level Administrator Standard Read-Only Limited Exam Administrator level may edit all records and edit users.
Standard level may edit all records, but not edit users.
Read-Only level may not edit any records.
Limited level may only view records for their self and their subordinates. These users can add requirements, and add, edit or delete completion records.
Exam level may only log on to take exams, enroll in classes, and view their status.
Add, Edit, or Delete a User
All employees are automatically assigned a user name and password so that they may log in to TRAIN TRACK®. The user name is the employee email address, and the temporary password is the employee ID number. You may also add users manually.
To manually add a user, follow these steps
| Step | Illustration |
| 1. From the navigation bar, select Users > Add User. | 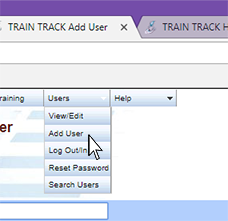 |
| 2. The Add User screen will open | 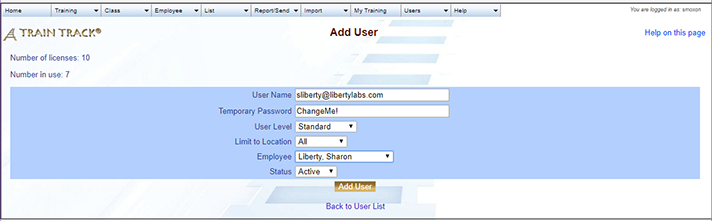 |
| 3. Type in the user name the user will log in with. This can be the Windows login name, email address, or another unique name. | 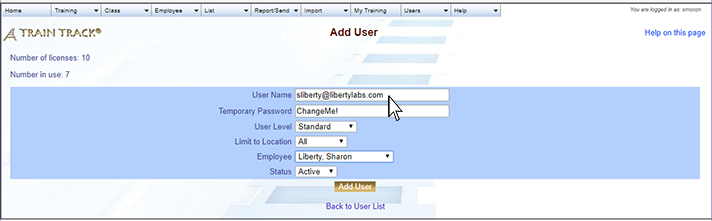 |
| 4. Type in a temporary password. The user will be required to change this password when she/he logs in. | 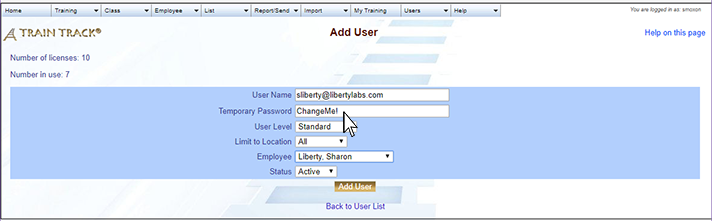 |
5. Select the user level: Administrator: has access to all records, users, and all program functions. |
 |
| 6. Select the location if you want the user to only view records from one location. A location license is required for each location. Leave "All" to allow the user to view all locations. |  |
| 7. Select the employee name to associate with this user. If the user is not associated with an employee, the user will not be able to take exams or view subordinates. |  |
| 8. Leave the status set to "active" and click Add User. | 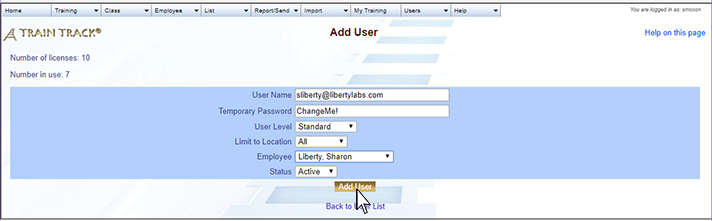 |
To edit a user, follow these steps
| Step | Illustration |
| 1. From the navigation bar, select Users > View/Edit. | 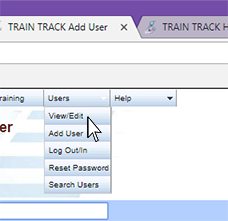 |
| 2. The User List screen will open. Select the user name you wish to edit. | 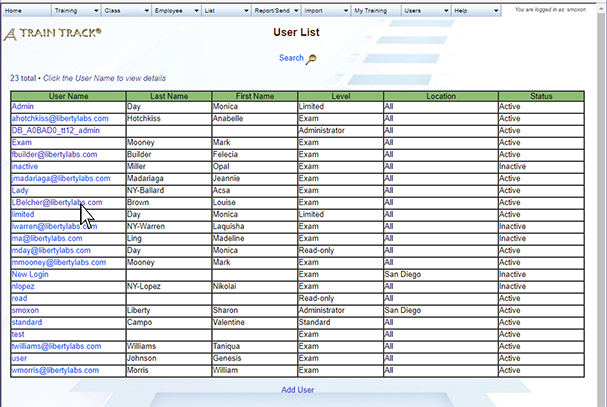 |
| 3. The User Detail screen will open. Edit the record (see adding users above for details) and click Save Changes. |  |
To delete a user, follow these steps
| Step | Illustration |
| 1. From the navigation bar, select Users > View/Edit. | |
| 2. The User List screen will open. Select the user name you wish to delete. | |
| 3. The User Detail screen will open. Click Delete User. | 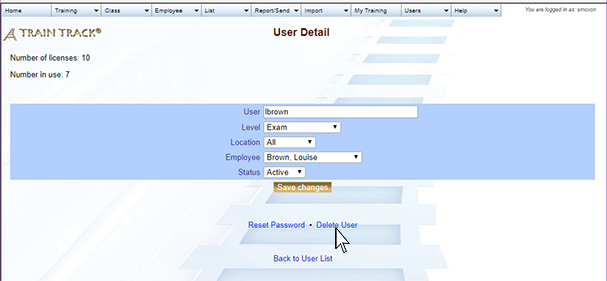 |
| 4. The Delete User screen will open. Click Delete. | 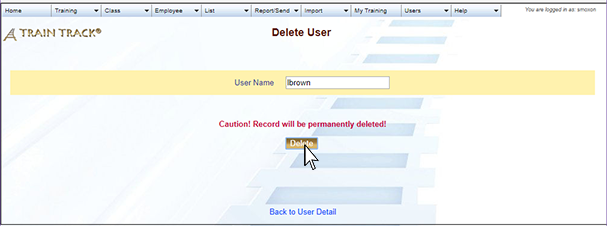 |
Search Users
To search for a user, from the navigation bar, select Users > Search Users. Type in all or part of the user name, first name, or last name to search for, and click "Go".
Log In and Out
In order to open the application, you will need to log in. On the login page, type your user name and password and click "Login".
Throughout the program, your user name is displayed on the top right corner of each screen.
To log out of the program, from the navigation bar, select Users > Log Out/In. Click "Logout" to confirm logging out of the program.
Reset Password
Users may reset their own password by going to Users > Reset Password. The user will be required to enter the current password, then type and confirm the new password. Administrators can reset passwords for other users by opening the user detail screen and clicking the "reset password" link.
Timeout
The application will timeout after a period of inactivity and require the user to log in again. The default period is 20 minutes.